Date: May 2020
In this tutorial, I am going to show you how to develop a simple ASP.NET Core 3.1 MVC
application. Because I want to use ASP.NET Core 3.1, I have to use MS Visual Studio 2019.
Normally, you can take the source code of my ASP.NET MVC tutorial (it is
here),
create an ASP.NET Core 3.1 MVC project in Visual Studio 2019, paste all this code
into the newly created project, do the following changes:
- change all the methods from Controller classes that previously returned
an ActionResult so that now they return IActionResult (this step is optional,
as the ActionResult class implements the IActionResult interface)
- get the parameters of the HTTP Request as parameters of the controller's
methods (we can not get the parameter like this anymore: Request.Params["parametername"])
- install the MySql driver directly into the application using the NuGet package manager
- the static files (html, css, js, including jquery) are now served from the wwwroot directory,
so the jquery path changes to "~/lib/jquery/dist/jquery.js".
and you should get a working ASP.NET Core 3.1 MVC application.
We will do just that, but we will also throw in the Entity Framework ORM (Object Relational Mapping)
in order to operate on the Mysql database using C# objects. So let's start with the beginning.
Step 1. Create the ASP.NET Core Web project
First, we create the ASP.NET Core Web project:

Second, we specify the project name and path:

We choose a MVC project for ASP.NET Core 3.1:

Step 2. Add the Mysql driver and
Mysql Entity Framework provider to our solution (using NuGet)
Right click on the project name in Solution Explorer and choose "Manage NuGet Packages":

Under the "Browse" tab, type "Mysql.Data" in the search bar and then click on the
found Mysql.Data package and then on the "Install" button:
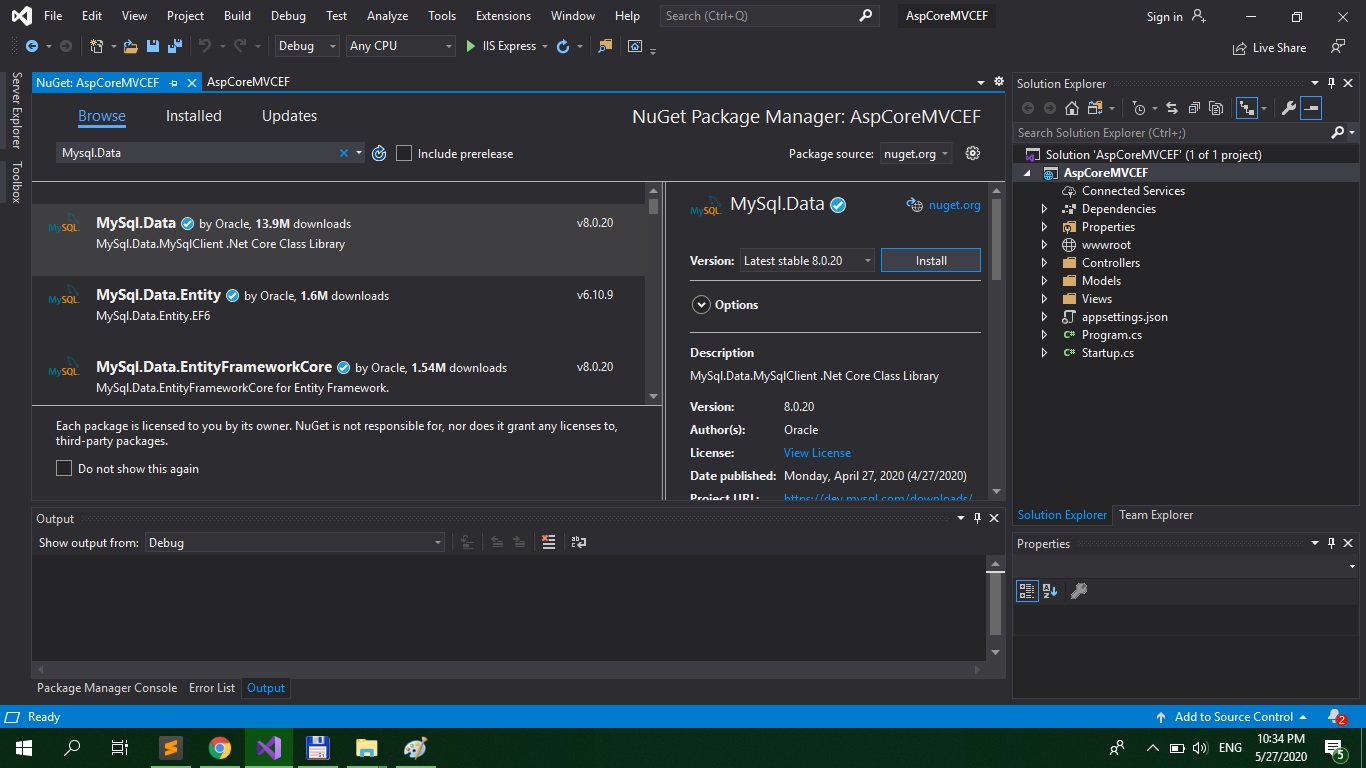
Package Mysq.Data (plus some dependencies) will be installed in our solution.
Do the same for the "Mysql.Data.EntityFrameworkCore". These two packages will
now be visible in Solution Explorer under Dependencies\Packages.
Next, we need to configure EntityFramework in order to be used by our application.
The Startup.cs file is responsible for configuring the application: the ConfigureServices()
method configures services used by our application (like MCV and EntityFramework) and
in the Configure() method, the web routing is configured.
We need to add the following lines at the end of the ConfigureServices() method in Startup.cs:
   		services.AddDbContext<DBWpContext>(options =>
                	options.UseMySQL(Configuration.GetConnectionString("WPDatabase")));
And add the corresponding package import statements in Startup.cs:
   		using AspCoreMVCEF.Data;
		using Microsoft.EntityFrameworkCore;
This just creates a database context that will be available to Controllers using DI (Dependency
Injection). We also need to add the "WPDatabase" connection string in the appsettings.json
file:
   		"ConnectionStrings": {
    			"WPDatabase": "server=localhost;uid=root;pwd=;database=wp;"
  		}
This connection string is referenced above in the ConfigureServices() method in Startup.cs.
We should not forget to actually create the DBWpContext class that will be used for managing
our database through Entity Framework. We create a new folder named "Data" in Solution Explorer
and in the "Data" folder, we add a new class named "DBWpContext":


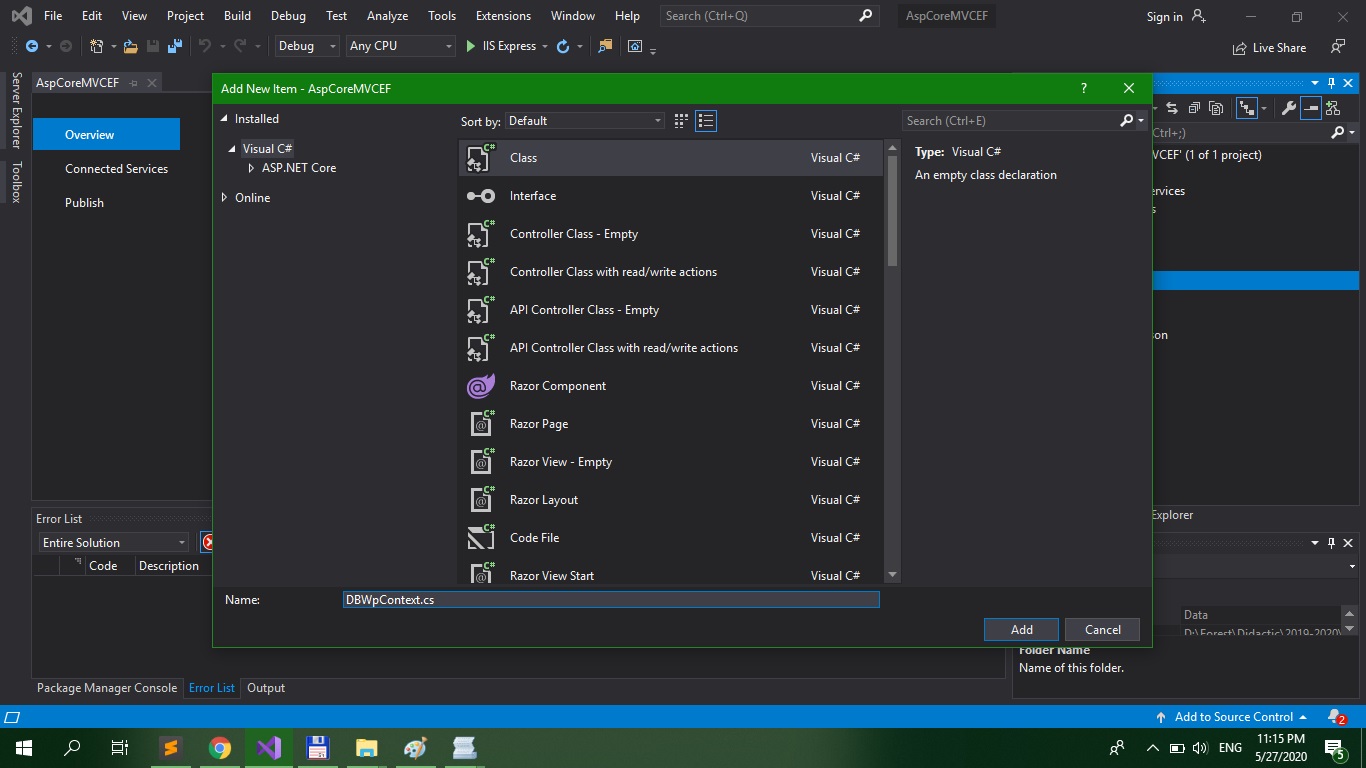
Paste the following code in DBWpContext.cs:
		using System;
		using System.Collections.Generic;
		using System.Linq;
		using System.Threading.Tasks;

		using Microsoft.EntityFrameworkCore;
		using MySQL.Data.EntityFrameworkCore;
		using AspCoreMVCEF.Models;

		namespace AspCoreMVCEF.Data
		{
			public class DBWpContext : DbContext
			{
    			public DBWpContext(DbContextOptions options) : base(options)
    			{
    			}

    			public DbSet<Student> Student { get; set; }
			}
		}
In this point, Visual Studio will signalize errors in the above class because we haven't
added the Student model to our project.
Step 3. Add model classes
Let's add the Student model (corresponding to the Student table in the DB):

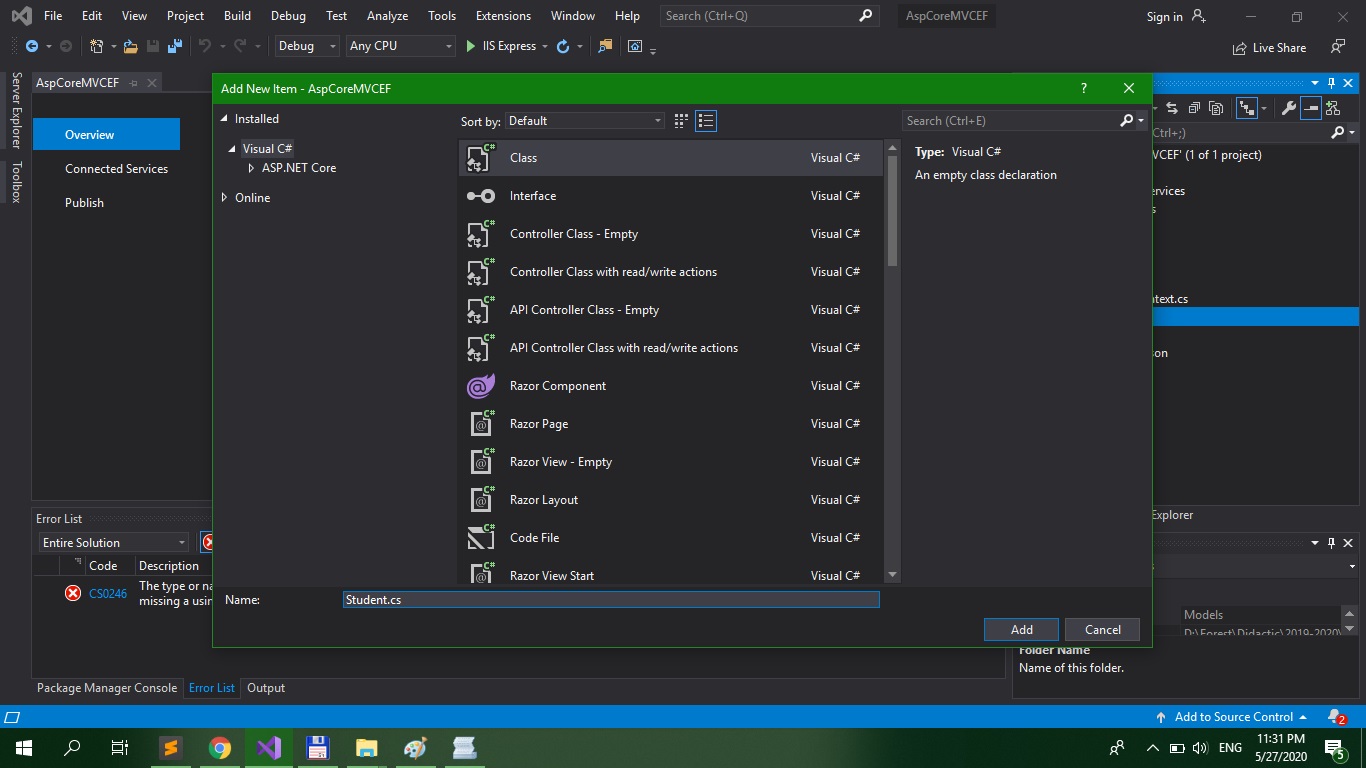
Paste the following code into the Student.cs file:
		using System;
		using System.Collections.Generic;
		using System.Linq;
		using System.Threading.Tasks;

		namespace AspCoreMVCEF.Models
		{
			public class Student
			{
				public int Id { get; set; }
				public string Name { get; set; }
				public string Password { get; set; }
				public int Group_id { get; set; }
			}
		}
Please note that in order for the Entity Framework to work, the model class name and its attributes
should match the name of the corresponding database table and its column names (i.e.
there should be a "Student" table in the database with the following columns: Id, Name,
Password, Group_id).
Step 4. Create the Controller
First, we create our first Controller (there is already a HomeController predefined by Visual Studio):

Let's call our new Controller, "MainController" (we will choose a "MVC Controller - Empty" type):


In order to test our new controller, add the following code to the MainController class in MainController.cs:
		public string Test()
		{
			return "It's working";
		}
And then run the project and write this URL in the browser: http://localhost:<port>/Main/Test.
The port number on which the embedded IIS server is run by Visual Studio is generated dynamically
for each run. Replace <port> with the correct value.
Then add the following code in MainController.cs:
		public string Test1(string param1 = "hello", int param2 = 0)
		{
			return "Result: " + param1 + param2.ToString();
		}
And then run the project and write this URL in the browser: http://localhost:<port>/Main/Test1?param1=aaaa¶m2=3. You will see that the HTTP request parameter "aaaa" will be mapped to
argument "param1" of the Test1() method and the HTTP request parameter 3 will be mapped to
the argument "param2" of the Test1() method.
Step 5. Create a view for making an Ajax call for all students from a specific group
Replace the code from the FilterStudents.cshtml file with the following:
            @{
                Layout = null;
            }

            <!DOCTYPE html>

            <html>
            <head>
                <meta name="viewport" content="width=device-width" />
                <title>FilterStudents</title>
                <script src="~/lib/jquery/dist/jquery.js"></script>
                <script>
                    $(document).ready(function(){
                        $("#button").click(function() {
                            $.get("/Main/GetStudentsFromGroup", {group_id : $("#group_id").val()},
                                function(data,status) {
                                    $("#maindiv").html(data);
                            });
                        });
                    });
                </script>
            </head>
            <body>
                GroupID: <input type="text" id="group_id" /><br />
                <input id="button" type="button" value="get students" />
                Lista studentilor din grupa:
                <div id="maindiv"></div><br />
            </body>
            </html>
This html page contains an AJAX jquery script (the jQuery library is already included into the project by default by Visual Studio; it's in the wwwroot folder; off course, you can add a newer version of jQuery to this folder) that submits a group_id to the GetStudentsFromGroup() method of the Main controller (this is where the URL /Main/GetStudentsFromGroup is routed to).
Step 6. Add the code for the GetStudentsFromGroup() method in the MainController.
Add the following code to the MainController:
        private readonly DBWpContext _context;

        public MainController(DBWpContext context)
        {
            _context = context;
        }

        public string GetStudentsFromGroup(int group_id)
        {
	    List<Student> slist = _context.Student.Where(stud => stud.Group_id == group_id).ToList();

            string result = "<table><thead><th>Id</th><th>Name</th><th>Password</th><th>Group_Id</th></thead>";

            foreach (Student stud in slist)
            {
                result += "<tr><td>" + stud.Id + "</td><td>" + stud.Name + "</td><td>" + stud.Password + "</td><td>" + stud.Group_id + "</td><td></tr>";
            }

            result += "</table>";
            return result;
        }
And also add in MainController.cs, the use package statements:
	    using AspCoreMVCEF.Models;
  	    using AspCoreMVCEF.Data;
The above code adds the Entity Framework context (i.e. _context) to our MainController (this context
will be provided to the MainController constructor by the ASP.NET Core framework through Dependency Injection). In the GetStudentsFromGroup() method, the "group_id" is the parameter sent through the
HTTP Request and the first line ("_context.Student.Where(stud => stud.Group_id == group_id).ToList()") uses the _context object in order to return all the Students that respect the
predicate "stud => stud.Group_id == group_id" (i.e. all students "stud" which have the "Group_id"
attribute equal to the "group_id" parameter from the HTTP Request). And then, it returns the data
in an html table.
Step 7. Run the application.
Replace the body of the Index() method in the MainController with the following:
        public IActionResult Index()
        {
            return View("FilterStudents");
        }
Run the application and write the URL in the browser:
http://localhost:<port>/Main
Step 8. Add the rest of the code to the project.
Now you can add the rest of the code in the MainController and the remaining Views.
The complete source code of the project is
here.
As an observation, I left in the above code the other method of manipulating the database data,
i.e. the manual way using the class DataAbstractionLayer.DAL, but its usage is commented out
in the MainController.cs, in case you want to switch from using Entity Framework to
doing it manually.
Also, another thing you can do, is instead of creating empty MVC Controllers,
you could create "MVC Controller with views, using Entity Framework" where you have to specify
the model class (AspCoreMVCEF.Models.Student) and the data context class (AspCoreMVCEF.Data.DBWpContext) and Visual Studio will scaffold/generate code for the CRUD (i.e.
Create, Read, Update, Delete) operations - it will generate the Controller and the associated Views.
But I do not want you to use this method for the labs or for the exam.
I have used Entity Framework to manage only one table in the DB (i.e. the Student table), but
off course you can manage other tables, by adding new model classes.


